Introduction to make a poster in PowerPoint
Ever wondered if you could design a professional-looking poster without needing expensive design software? If you’ve got Microsoft PowerPoint on your computer, you’re already equipped to tackle this. We’ve been there, scrambling to create a poster for a last-minute event, and PowerPoint turned out to be a lifesaver. So, how do you make a poster in PowerPoint? It’s pretty straightforward: Open a presentation, adjust your slide size, use the built-in tools to design your poster, Save and export it and you’re set. Continue reading as this guide’s got your back with a clear, step-by-step process.

Pressed for time or want something extra sleek? Check out our affordable price list at domypowerpoint (powerpoint design agency). As long as it is done by PowerPoint, our team can make you a custom poster that’s sharp, professional, and exactly what you need, whether it’s for a presentation or an event. Contact us and let’s make it happen.
| Step | Description |
| 1. Open PowerPoint | Start a new presentation in Microsoft PowerPoint. |
| 2. Adjust Slide Size | Set the slide dimensions to match your poster size. |
| 3. Design Your Poster | Use built-in tools like text boxes, images, and shapes to create your layout. |
| 4. Save & Export | Save your poster in the desired format (e.g., PDF, PNG, JPG). |
| 5. Get Professional Help | If you need a polished design, contact domypowerpoint for custom poster creation. |
Why Use PowerPoint for Posters?
PowerPoint isn’t just for presentations; it’s a versatile tool that can help you design posters with ease. Many people choose PowerPoint because It’s widely available and familiar. Also, it offers plenty of customization options for text, images, and shapes, through which You can create designs that are both print-ready and suitable for digital displays.
Here’s a quote from the experts at Microsoft Office Support :
“PowerPoint is an excellent tool for poster design because it’s user-friendly and widely accessible. Most people already have it on their computers, and its features are intuitive for both beginners and experienced users.”
Getting Started: Preparing Your Workspace
Here’s the step-by-step process:
1. First of all, start a blank presentation and open PowerPoint.
2. Go to the “Design” tab that is located at the top of the window.
3. Select “Slide Size” and then click on it. From the options that appear, select “Custom Slide Size”.
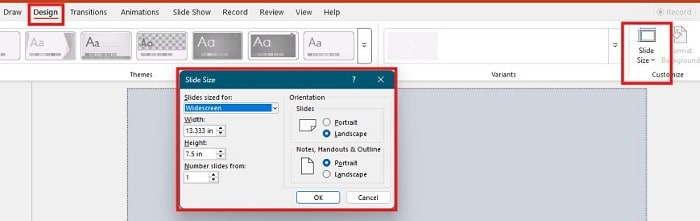
4. In the window that opens, enter your poster’s width and height. For example:
4.1. To design an A1 poster, type 33.1 inches wide by 23.4 inches high (for landscape, flip these dimensions).
4.2. To design an A2 poster, choose 23.4 inches wide by 16.5 inches high.
4.3. To design an A3 poster, use 16.5 inches wide by 11.7 inches high.
4.4. To design an A4 poster, set it to 11.7 inches wide by 8.3 inches high.
5. Determine the orientation of your poster; if it is taller, use the portrait orientation, and if it is wider, use the landscape orientation.
6. The moment you click OK, it is set in stone.
Choosing Orientation and Size Options
Depending on your content and where you plan to display the poster, you can choose either portrait or landscape orientation. Here are some common sizes you might consider:
| Poster Type | Dimensions (inches) | Dimensions (cm) |
| A1 Poster | 23.4 x 33.1 | 59.4 x 84.1 |
| A2 Poster | 16.5 x 23.4 | 42 x 59.4 |
| A3 Poster | 11.7 x 16.5 | 29.7 x 42 |
| A4 Poster | 8.3 x 11.7 | 21 x 29.7 |
| Custom Landscape Poster | 36 x 24 | 91.4 x 61 |
| Custom Large Poster | 56 x 36 | 142.2 x 91.4 |
Whether you need to make a poster in PowerPoint for academic or promotional purposes, adjusting the slide to the correct dimensions is key.
This video by SmithInstituteJCSU demonstrates how to set custom dimensions and choose the correct orientation:
Watch Out for the Size Limit
PowerPoint does have a ceiling, 56 inches by 56 inches max. If you need a giant poster, design it smaller and scale it up later, or switch tools. For most projects, though, 56 inches is plenty.
Going Landscape?
If you’re wondering how to make a landscape poster in PowerPoint, it’s as simple as making the width bigger than the height. For an A1 landscape, just enter 33.1 inches wide and 23.4 inches high.
Step-by-Step Poster Creation in PowerPoint
Now that your workspace is settled, it is time to walk through the process, step by step.
Set Up Your Slide
• Open PowerPoint and start a new presentation.
• Go to Design > Slide Size > Custom Slide Size.
• Enter your required dimensions (e.g., 59.4 cm x 84.1 cm for an A1 poster).
• Choose an orientation—portrait or landscape—depending on what you require for your project.
Create a Great Layout
A strong layout is a foundation of a good poster:
• Visual Hierarchy: Make your title and critical points jump out using larger fonts and bold colors.
• White Space: Leave enough space between elements so your poster doesn’t look cluttered.
• Guides and Grids: Use the ruler and grid tools that PowerPoint has to align all your text boxes and images just right.
Add Text and Titles
Next, you will add words:
• Insert a Text Box: Click on Insert > Text Box and place it where you want your title.
• Title and Headings: The title must be large and easy to read (preferably a font size between 72–85pt). Use subheadings to introduce further divisions.
• Body Text: The main content should adopt legible fonts, like Verdana or Tahoma, around 24 or bigger.

Offering your texts in different text boxes helps retain flexibility in your design at the later stages.
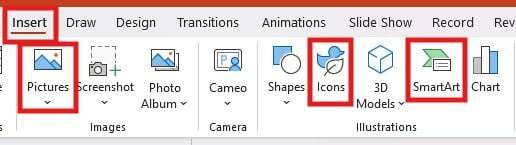
Spice It Up with Pictures and Other Visuals
These elements will animate your poster:
• Insert Pictures: As described above but make sure they are all of high quality. That is, make sure they print well (150 dpi or better).
• SmartArt: Make diagrams or infographics using the SmartArt feature or inserting Shapes.
• Icons: Use icons from PowerPoint’s library to illustrate a point.
“High-quality visuals not only catch the eye but also help convey complex information quickly.”
–tips from SlidesAI
If you need to remove background picture from PowerPoint slide, PowerPoint provides an easy built-in tool to do so. Just select the image, click on “Remove Background,” and refine the selection as needed.
PowerPoint offers several customization options for design elements. If you need to merge different shapes in PowerPoint, you can do so by selecting multiple shapes, going to the “Shape Format” tab, and using the “Merge Shapes” tool to combine, subtract, or intersect them.
Background customization
Background-sets the mood of the poster:
• Format background: Right-click on the slide and select Format Background.
• Options: Choose a solid color, gradient, or maybe a somewhat subtle image that won’t overbear your content.
• Simplicity: An unremarkable background will oftentimes make text and visuals stand out without distraction.
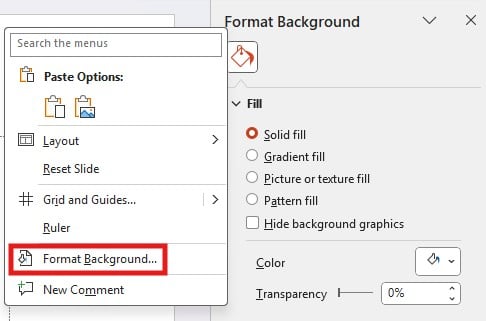
For instance, an academic poster might benefit from soft gradients and the promo event poster may be better served with very bold, dark backgrounds.
Polish your design
Set aside all your word-numbing and touch up some
• Proofread: Check through text to snaffle typos and errors.
• Alignment and spacing: To ensure neat alignment, use PowerPoint’s alignment tools.
• Preview: Fit to window to get an idea of your poster full-size and get a good sense of overall balance.
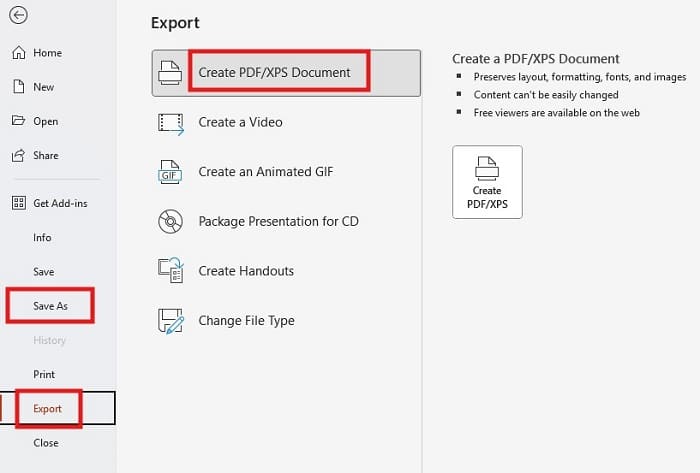
Save, export, and print
When finished:
• Save It: Keep a backup in .pptx format for PowerPoint.
• Export as a PDF: File>Export (or save as) PDF. This format helps retain your layout so that your poster is appropriately printed.
• Print-it from a large format printer. If you have to, print your poster in separate sections and assemble.
Advanced Tips and Tricks
Creating a Poster on a Mac
Mac users can follow the same steps:
• Page Setup: Access File > Page Setup to change slide dimensions.
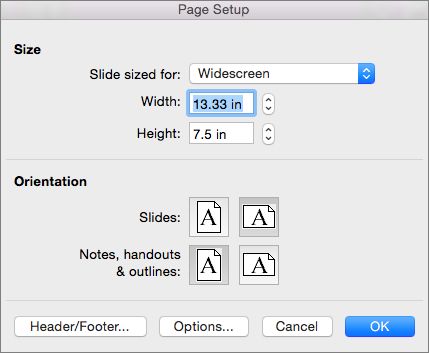
• Similar Tools: The tools and options are nearly identical to the Windows version, so you’ll have an equally smooth experience.
• Export Options: Export your design as a PDF to ensure it retains all formatting.
Making an E-Poster in PowerPoint
Digital posters (or e-posters) can be interactive:
• Interactive Elements: Consider adding hyperlinks that direct viewers to more detailed content.
• Animations: Use subtle animations to guide the viewer’s attention, but avoid overdoing it.
• Export for Web: Save your file in both PDF and image formats for digital sharing.
Frequently Asked Questions (FAQs)
How can I create a poster in PowerPoint?
Just create a new presentation, select the correct poster size, and start creating a layout with text boxes, images, and shapes. When you’re finished, simply export it to PDF for printing or sharing.
How do I change the size of my PowerPoint poster?
Go to ‘Design’-‘Slide Size’-‘Custom Slide Size’ where you can set your preferred size. You may either specify the dimensions in mm for standard sizes such as A1, A2, A3, or create sizes according to your own custom measurements.
Can I use PowerPoint Designer to help design my poster?
Yes, PowerPoint Designer is an easy option that can give you layout suggestions and design ideas, making it much easier for you to create a striking poster if, for any reason, you are not a design pro.

How do I add images to my PowerPoint poster?
Use ‘Insert’-‘Pictures’ to insert images from your personal computer or online stock image resources. Make sure that your images have high resolution (preferably 150 dpi) to ensure a clear print.
What is the best way to format text on my poster?
Create separate text boxes for each section (title, headings, text) and select one or two different fonts that are easy to read with their respective correct sizes: with 72-85 for title, 36-40 for headings, and 24 point or more for text. Colors should contrast enough with each other for clear visibility.
How can I print my PowerPoint poster?
Export the design to PDF and use a printer that specializes in large format or print your poster in sections and put it together.
Can I use a template to create my poster in PowerPoint?
Definitely. A whole heap of PowerPoint poster templates is found online that can help make your design process easier. They are especially beneficial when you want a quick and professional-looking layout.
What types of posters can I create using PowerPoint?
From academic research posters to business event flyers, PowerPoint’s flexibility allows one to create a wide variety of designs, including promotional and digital e-posters.
Does this tutorial work for other versions of PowerPoint?
Yes, the steps here will work for all versions of PowerPoint, Windows, Mac, and even online. Some of the menu options may vary approximately, but the process remains more or less the same.
What’s the maximum poster size in PowerPoint?
The most considerable dimensions for a PowerPoint slide are 56″ x 56″ (142.24 cm x 142.24 cm). Should you need something larger, you might want to resort to professional design software such as Adobe InDesign.
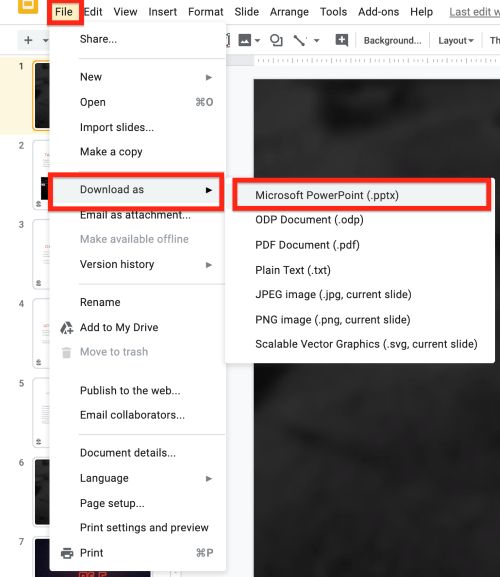
Can I design the poster using another presentation software and convert it to PowerPoint?
Yes, you can design the poster in Google Slides and then export it as a PowerPoint presentation.
If your poster requires a structured timeline, learning how to create a timeline in PowerPoint can be useful. You can use SmartArt, insert shapes manually, or explore PowerPoint add-ins to craft a visually engaging timeline.
Wrapping It All Up
At this point, you have an understanding of how to make a poster in PowerPoint—workspace configuration, layout, text, and picture incorporation, and the finishing touches. You’re creating this poster for an academic conference, business event, or some creative tasks, and PowerPoint provides you with all the flexibility and tools to design something nice and respectable.
But your experience does not finish here. Go ahead. Practice. Experiment with templates, don’t hesitate to experiment with different design styles and other elements until you’ve found what fits best for your message.
In case you want more help or maybe more professional services, our team at domypowerpoint will be pleased to help you out. Take a look at our PowerPoint Powerpoint Presentation Price List, presentation design services and Pitch Deck Design Services Services by visiting our website.


