
Create a Timeline in PowerPoint methods
Timelines in PowerPoint are great features for visually representing historical events, business plans, or projects. You can create a timeline using a timeline maker that automates the process or choose to craft it manually.
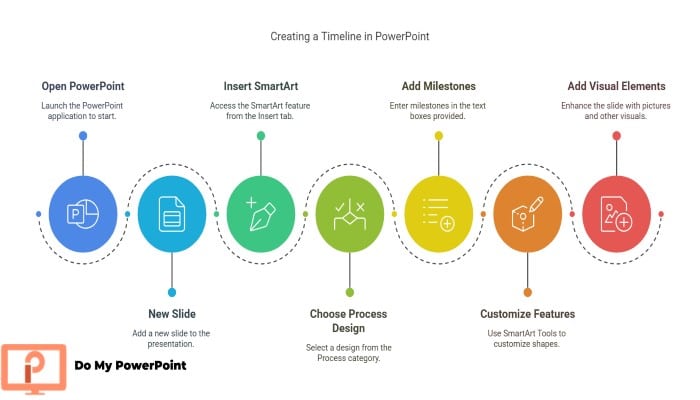
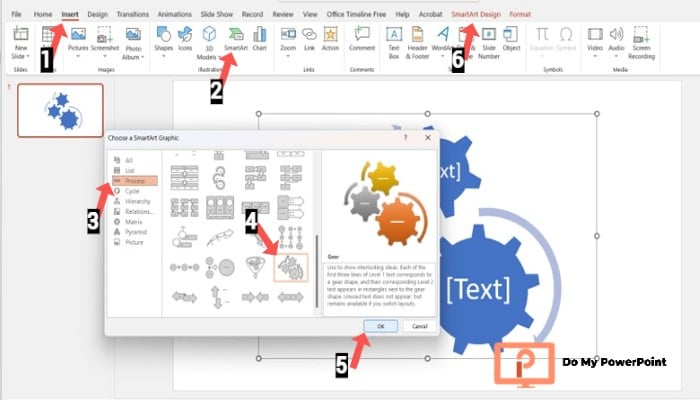
In the following, we will explain how to create a basic timeline graphic in PowerPoint using SmartArt tools:
1. Open PowerPoint, click New Slide, and then Blank Slide.
2. In the Insert tab, find SmartArt and click on it.
3. Choose the Process category and pick your suitable design.
4. In Text Boxes, consider the milestones and press Enter for more.
5. With SmartArt Tools, customize the features such as shapes.
6. Add your desired visual elements, such as pictures.
| Step | Action |
| 1 | Open PowerPoint, click New Slide, and then select Blank Slide. |
| 2 | Go to the Insert tab, find SmartArt, and click on it. |
| 3 | Choose the Process category and pick a suitable design for your timeline. |
| 4 | In Text Boxes, enter milestone descriptions and press Enter to add more steps. |
| 5 | Use SmartArt Tools to customize shapes, colors, and layout. |
| 6 | Add desired visual elements, such as pictures or icons, to enhance the timeline. |
One may need to show accurate details through a timeline or update it once in a while. In this case, the automatic option will be a fast, simple solution that suits higher-level presentations. On the other hand, users are able to create a basic timeline for a simple graphic tailored to presentations. These timelines can be manually adjusted and restyled.
Now, it’s time to learn all other options for creating a timeline in PowerPoint and across various devices.
According to InkPPT:
Do not forget that high-quality visuals increase the engagement of your presentation by up to 80%.
Contact our team at Do My PowerPoint for more info. Stay with us till the end.
Speedy Delivery & Top Quality – Reach Out for a Free Design Review!
Creating a timeline manually can be an efficient method for businesses that require flexibility in design. If you need professional assistance, our PowerPoint design services ensure that your timelines are well-structured, visually appealing, and engaging for your audience.
Creating a Timeline in PowerPoint Manually (Basics)
We have explained how to make a timeline with SmartArt in PowerPoint above. You will also have plenty of options for creating a timeline, adding shapes, and other features. These step-by-step guides will help you have a timeline that exactly fits your needs.
Making a PowerPoint Timeline Manually with Shapes
If you would rather have fully customized timelines, we suggest using shapes since you will have control over the design and also adjust the colors, layouts, etc. For such a purpose, follow the steps below:
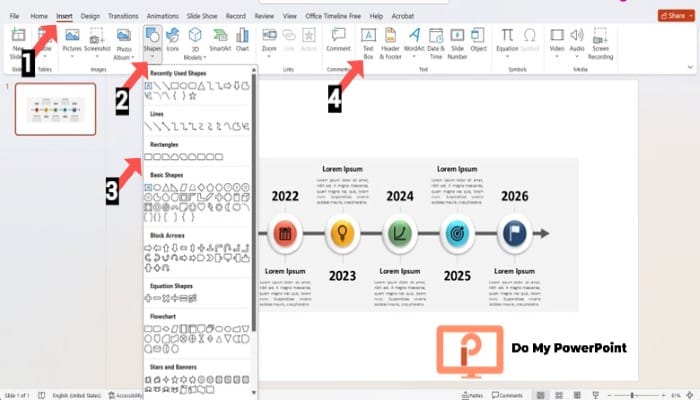
1. Add a Blank Slide and open the Insert tab.
2. Select shapes and then a line for your main timeline.
3. Make the key milestones by adding Circles or Rectangles.
4. Use Text Boxes to add your details and dates.
5. Consider any adjustment that it needs for a more polished look.
6. You can also add Animations and other Visual Effects to make it more professional.
To streamline the process and achieve a polished final product, you may want to explore presentation design services that specialize in creating high-quality timelines.
How to Create a Timeline in PowerPoint with Pictures
For a fully customized and manually created timeline with pictures, please open your PowerPoint and follow these steps, whether manually or using SmartArt:
Manually:
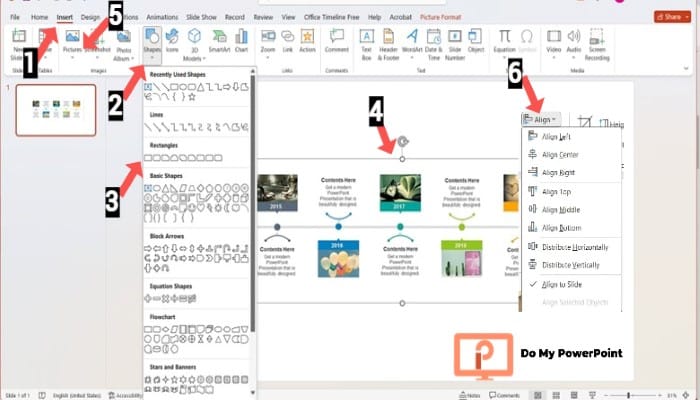
1. Go to the Insert tab and select shapes; choose a Line, Circle, or Rectangle for millstones
2. Add sufficient text boxes to label the events
3. Click Insert and then Pictures and select the image that you want
4. Adjust your image position and size. You can also use Alignment tools.
Using SmartArt:
1. Start with Insert > SmartArt > Process.
2. Pick a picture-based timeline, such as the Picture Accent Process.
3. Click on each picture icon and add your intended picture.
4. Enter your data into the text boxes as well.
5. As usual, you can format and adjust the timeline design using the SmartArt Design tab.

Creating an Overlapping Timeline in PowerPoint
When in need of a timeline that visualizes multiple projects and events simultaneously, you can create it manually with the help of shapes or use a SmartArt Process Diagram. We explain both as follows:
Manually:
1. Insert a base timeline through Insert > Shapes, a horizontal line, and circles or rectangles for milestones.
2. Add another timeline with parallel or curved lines for overlapping events.
3. Add enough text boxes to label the events and add dates and descriptions.
4. Choose distinct colors or styles for each timeline using Shape Format to differentiate them.

Using SmartArt:
1. Start with Insert > SmartArt > Process and follow up by choosing a time line style such as Alternating Flow or the Basic one.
2. Select Placeholders and enter milestone details. To add more events, click on Enter.
3. In the SmartArt Design tab, change layouts, styles, or shapes for overlapping events.
4. You can differentiate the projects using the Change Color button in the SmartArt Design tab.

| Create a Timeline in PowerPoint Manually | |
| Timeline Type | Steps |
| Manual Timeline with Shapes | 1. Insert a blank slide. |
| 2. Add a line for the timeline. | |
| 3. Add shapes for milestones. | |
| 4. Use text boxes for details. | |
| 5. Adjust design for polish. | |
| 6. Add animations/effects. | |
| Manual Timeline with Pictures | 1. Insert a line, circle, or rectangle for milestones. |
| 2. Add text boxes for events. | |
| 3. Insert pictures. | |
| 4. Adjust image size and position. | |
| Manual Overlapping Timeline | 1. Insert base timeline with line and shapes. |
| 2. Add parallel or curved lines for overlapping events. | |
| 3. Add text boxes for events and dates. | |
| 4. Use different colors/styles for each timeline. | |
How To Create Automatic Timeline in PowerPoint
Using Office Timeline allows you to avoid time-consuming and difficult methods for creating a timetable in PowerPoint. This is a PowerPoint add-in that automates the process of timeline crafting. To use it for a professional timeline, follow these steps carefully.
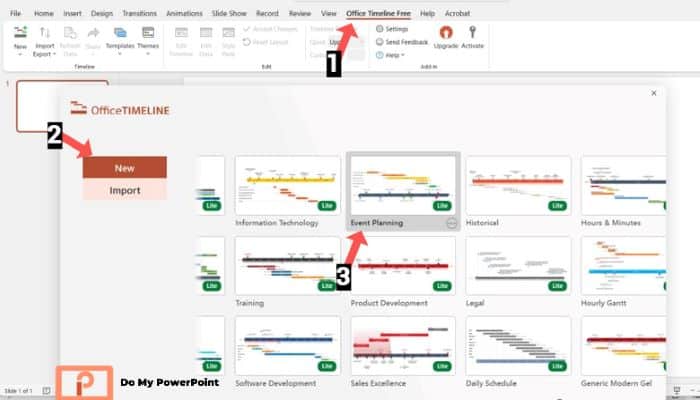
1. Install Office Timeline if not installed yet. Then click New in its tab.
2. Choose your desired timeline template and click Use Template.
3. It’s time to input your data, such as milestones. You can enter it manually or copy it from Excel.
4. Click Create to generate the timeline in no time.
5. Adjust all features such as colors, shapes, etc.
How to Import Data from Excel to a Timeline in PowerPoint
You can also simply import a structured project data from excel into PowerPoint slides as far as you have Office Timeline add in. this is specifically beneficial for those who need generate a presentation and do not want to enter the events manually once again.
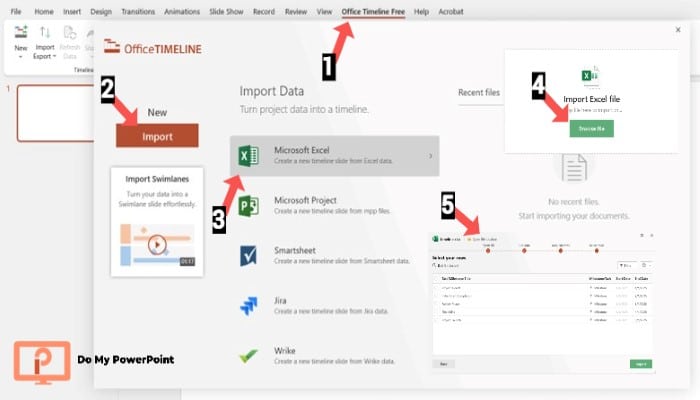
1. Ensure you have Office Timeline add-in installed.
2. Select the Office Timeline Tab and then choose Import Data.
3. Upload your Excel file that contains data. The file should have dates, event names, and millstone columns.
4. Fit your Excel columns with the Office Timeline elements (map your data).
5. Click Import to have a timeline based on your data.
6. You can use Office Timeline Options for a more customized timeline.
Advanced Techniques for Elaborative Timelines in PowerPoint
Creating basic timelines seems straightforward for many users. However, they are not always suitable for more complex, high-end presentations. That’s why you may need more advanced techniques for making a timeline slide in PowerPoint. We have pulled together a series of them in the following, such as animated timelines. Please feel free to contact Do My PowerPoint well-versed team if you need any further help:
How to Create a Timeline in PowerPoint with Dates?
Do you look for a clear chronology of events in your timeline? You can now incorporate dates and simplify making connections with your audience. All you need is to follow these steps:
1. Start with the Insert tab, SmartArt > Process, and select your timeline style.
2. Enter milestones and corresponding dates in the Text Pane.
3. In the SmartArt Design tab, adjust the layout or style to match your date format.
4. Customize the size, font, and other features of the date.

Creating a Timeline Chart in PowerPoint
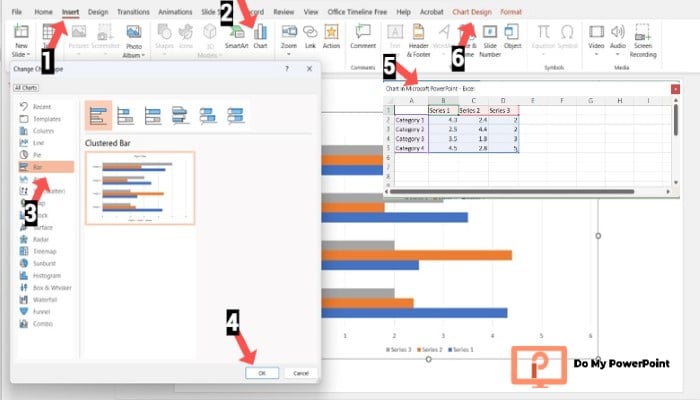
Timeline charts are more data-driven in spite of basic shapes. They typically need to display time-based, and PowerPoint chart tools have made it easy for you:
1. Select a Line Chart or Bar Chart in the Insert > Chart
2. Input your timeline data in the window that opens, including dates and the milestones or events in separate columns.
3. In the Design tab and Chart Tools, adjust the style until it looks like a timeline.
Making an Animated Timetable in PowerPoint
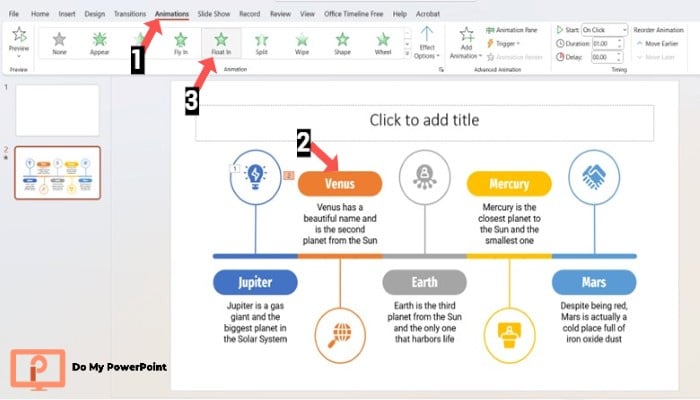
If you like to bring your timetable into life, follow the steps and add dynamic effects to it. Animations for sure take your presentation to the next level and grab more attentions.
1. Create a timeline at first using Shapes, Table, or SmartArt.
2. Add milestones and other features, such as dates or events, in their correct orders.
3. Click on the part that you want to be animated (Whether a shape, picture, or text box)
4. Click on the Animations tab and select your intended effect. It is also possible to use Motion Paths.
5. Adjust the effects duration and other characteristics by clicking on the Animation Pane.
6. Preview the animated timetable slide to make sure everything is right.
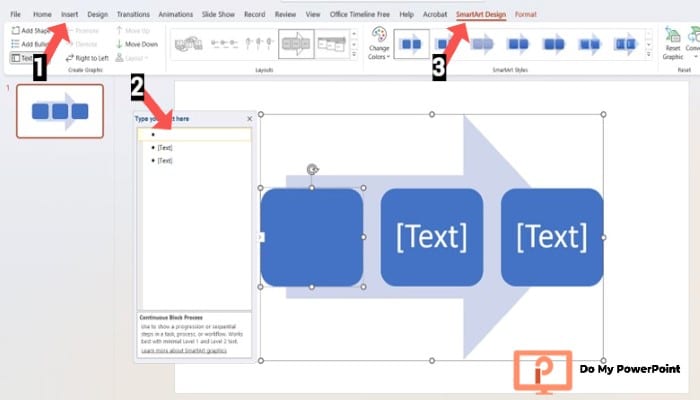
Creating a Linear Timeline in a PowerPoint Presentation
Linear timelines are very common, effective, and simple to present chronological events. PowerPoint also offers a series of tools to make such a timetable. The steps to create such a timetable are as follows:
1. Go to the Insert tab and continue with SmartArt > Process and choose Continuous Block Process or a Basic timeline.
2. Enter all data in the Text Pane such as events.
3. The SmartArt Tools Design tab allows you to adjust the layout, change shapes, or resize it.
4. Customize the color, font, and shapes for a better look.
Creating a Curved Timeline Slide in PowerPoint
The following steps help you craft a curved timeline, which is also called a pillar cluster, to illustrate your targets, milestones, and achievements over time:
1. Start with a blank slide and the Insert tab.
2. Continue with SmartArt > Process and pick a curved layout such as Accentuated Timeline.
3. Insert the timeline into the slide and enter your data.
4. Customize the design of your curved timeline using the SmartArt Design tab.
| Advanced Techniques for Elaborative Timelines in PowerPoint | |
| Timeline Type | Steps to Create |
| Timeline with Dates | 1. Go to Insert > SmartArt > Process and select a timeline style. |
| 2. Enter milestones and dates in the Text Pane. | |
| 3. Use the SmartArt Design tab to adjust the layout and style. | |
| 4. Customize size, font, and other formatting. | |
| Timeline Chart | 1. Insert a Line Chart or Bar Chart from Insert > Chart. |
| 2. Enter timeline data (dates & milestones) in the pop-up window. | |
| 3. Adjust chart design using the Design and Chart Tools tabs. | |
| Animated Timeline | 1. Create a timeline using Shapes, Table, or SmartArt. |
| 2. Add milestones, dates, and events in order. | |
| 3. Select an element (shape, text, or picture) to animate. | |
| 4. Click Animations and choose an effect. | |
| 5. Adjust effect duration using the Animation Pane. | |
| 6. Preview the animation. | |
How to Create a Horizontal Timeline in PowerPoint?
There are several methods for creating a horizontal timeline in PowerPoint. Shapes and text boxes help you achieve your purpose, or the easier way is to use SmartArt. Creating a timeline chart is another way to visualize your data horizontally.
For more advanced timelines, you can try Office Timeline add-in. We will explain all methods thoroughly step by step in another article at Do My PowerPoint. Follow up our blogs for further explanation.
How To Create a Historical Timeline in PowerPoint?
Historical timelines may come at various complexity depending on the level of details and the need for customization. SmartArt is probably a helpful option to fulfil a great look for such a timetable. It provides you with some ready-to-use layouts for representing the chronological events. Chart-based timelines can also be helpful in this regard.
However, you need a complete guide for making a perfect historical timeline. That is why we have decided to work on this subject in another article completely. Please follow us to stay on track.
How to Make a Project Timeline PowerPoint
SmartArt Graphics is probably the best option for creating a project timeline and visually indicating the tasks and milestones. However, PowerPoint allow you to use transitions and animations for creating a more effective timetable. It is specifically useful when you need to track progress or share project goals with your team member.
You can also visit our future articles and gain helpful information about project timelines here at Do My PowerPoint.
How to Create a Vertical Timeline in PowerPoint
You can show a series of chronical events in a left to right timeline (horizontal) or in a top-to-bottom timeline (Vertical) with the help of SmartArt. It offers various vertical process layouts such as Vertical Block List and allows you to customize them based on your needs and desires. It is also possible to create a vertical timeline manually as well, but SmartArt is much easier.
Do My PowerPoint has also considered a complete guide for such timelines and invites you to read it for more.

Why Use PowerPoint for Making Timelines?
When in need of creating a timetable for your presentation, PowerPoint provides a series of unique features for you. Besides, you will benefit from its user-friendly area in addition to add-ins like SmartArt. Other reasons include:
• You will be able to modify your timetable look, font, color, etc., and customize it as you wish.
• PowerPoint is flexible, which means it allows you to make any type of timeline that fits your needs.
• PowerPoint is linked with other Microsoft Office tools, such as Excel.
Is There any Website that Creates Timeline Online?
There are some websites that excel in creating a timeline online, such as Canva, Time.Graphics, Adobe, and SmartDraw. You can utilize any of these platforms to craft a professional timetable for your upcoming presentation. Below, we will explain thoroughly how you can use one of the best websites in this field, Time.Graphics:
This is an interactive tool for creating data-driven and high-end timelines, a platform that provides users with project schedules, a combination of milestones and images, event projects, and so many others. You can even add geographical data and ask this tool to visualize it for you. Researchers, students, businessmen, and any individual can use Time.Graphics through the steps below:
1. Open Time.Graphics website, then create an account.
2. Click Create and make any adjustments that you need.
3. Click Plus (+) and enter your data details, then you can add any link or pictures you want.
4. It is possible to adjust your timeline by dragging, changing colors and fonts, and scale.
5. Click Save and export your file in your desired format (image, link, or PDF)

Samples of Professional Timelines Created by Do My PowerPoint Team
Below, you can see one of the timelines designed by the Do My PowerPoint team. This is a Horizontal Timeline where milestones are spaced out along a linear path. Each milestone appears one after another and incorporates images or icons to represent each stage. This timeline is most suitable for historical progressions or project phases, using Motion Path Animations for a smooth, engaging presentation:
Conclusion
PowerPoint is a suitable platform for making timelines of any kind. On one hand, SmartArt is a built-in template provider for timelines and allow you to customize your presentation, on the other hands, there are many features for manually designing a timetable, such as shapes, text boxes, charts, and lines.
Office Timeline is also an add-in facility in PowerPoint for making automated timelines. Whether picking a horizontal timeline, a timetable with infographics, a project timeline, etc., PowerPoint has something to offer. You can also entrust your presentation needs to our professional team for the best result.
Affordable Rates, Fast Turnaround, Superior Quality – Get Started Now!
While PowerPoint allows users to create timelines manually, many prefer professional assistance to ensure their timelines are impactful and visually compelling. If you’re wondering about the PowerPoint presentation price list, costs can vary depending on complexity, animations, and customization level.
For those who need a high-quality timeline but want to optimize their budget, understanding the cost of PowerPoint presentation is essential to making an informed decision.
FAQs
How to Make a Timeline Arrow in PowerPoint?
From Insert tab, select SmartArt > Process. Then you can choose an arrow-like process such as Continuous Arrow, and then add events, dates and other data in the text boxes. You can also choose the arrow shape in the Insert tab, add text boxes and create your timeline manually.
How to Make a Beautiful Timeline in PowerPoint?
SmartArt provides a full range of structured customizable layouts that allow you to adjust fonts, colors, and shapes. You can also add visual elements such as animations to make it more beautiful as you want.
How to Create a Timeline Bar Chart in PowerPoint?
In the Insert tab > Chart, pick a bar chart. Enter your data in the Excel window that opens enter your data. Then adjust the bar chart so that it looks like a timeline in the end. You can also use SmartArt basic timeline or shapes as well.
How to Make a Long Timeline in PowerPoint?
Whether you have used SmartArt or Shapes, you can extend your timeline and make it longer horizontally. The scrolling timeline effect can also be helpful in this regard.


