
A comprehensive guide to Create a Loop in PowerPoint
Have you ever thought about how PowerPoint presentations can be made to run on repeat with zero effort? We will explain how to make PowerPoint loop straight from opening your file to adjusting settings so that your presentation flows seamlessly over and over again. This guide has all the steps you need, and some more. Read on for the detailed instructions, and also the extra tips.
Here’s a quick step-by-step answer to get you started: Open the PowerPoint presentation, to the “Slide Show” tab, click on “Set Up Slide Show”, check the box “Loop continuously until ‘Esc’” and click on OK. The Slideshow is started by F5, and your presentation will loop forever until you hit ‘Esc’.
 At DoMyPowerPoint.com, every single presentation has the ability to grab attention. With our expert presentation services and affordable prices, you’ll not only have a perfect looping in PowerPoint but also optimized slides for various platforms and more!
What Does “Loop” Mean in PowerPoint?
Before we even get into the nitty-gritty of how to create a loop in PowerPoint, I think it’s best to first understand what a loop actually is in this context. In PowerPoint, a loop is simply a property that enables the slideshow to play continuously from the beginning when it reaches the last slide and then it restarts itself. This feature is incredibly useful for: Kiosk Displays and Trade Shows, Digital Signage, Educational or Training Sessions, Corporate Events.
With the right loop, your presentation can be able to present itself, and do so repeatedly, without the need of a manual restart.
Step-by-Step: Setting Up a Looping Presentation
In this article, we will discuss how to make a PowerPoint slideshow loop with a step-by-step guide. This approach is compatible almost all versions of PowerPoint, including Microsoft 365, PowerPoint 2019, and previous versions.
1. Open Your Presentation
To begin with, launch PowerPoint: First of all, open the file that you want to edit.
Review Your Slides: It is always better to be safe than sorry, so please ensure that all the information is up to date and that there are no unnecessary slides or they are placed in the right order.
2. Access the Slide Show Settings
Slide Show Tab: From the ribbon, click on the ‘Slide Show’ tab.
 Set Up Slide Show: This will bring up a dialog box that will allow you to change various aspects of how your presentation will behave when played back.
3. Enable the Loop Option
Find the Loop Checkbox: Look for the option that has the label ‘Loop continuously until ‘Esc’.
 Tick the Box: When this setting is checked, it means that your presentation will play continuously. This is particularly helpful when you do not want your audience to be stuck at one slide.
Other Options can also be customized: You can also decide the first slide that should be displayed and whether the transition should be forced here.
4. Save and Test:
Save Your Changes: It is always better to have a copy of the file saved before testing the slideshow.
Run the Presentation: Now, play the slideshow to check if the modification you have made is correct. It should be checked whether at the end of the presentation, it returns to the first slide.
Advanced Techniques for Looping in PowerPoint
Ready to take it to the next level? Here are some advanced tips that will allow you greater control over your looping presentation.
Setting Specific Time Intervals for Each Slide
There are instances when a presenter may want a specific slide to stay on-screen for a bit longer, be it to give an important stat enough time to sink in or allow sufficient time for the audience to read a complex diagram. Here’s how you set up custom timings for them:
1. Choose Slide: Click on the slide you wish to modify.
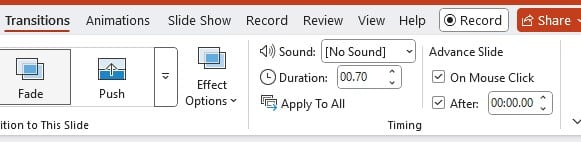
2. Go to Transitions: Click on the “Transitions” tab on the ribbon.
3. Set Timing: Under the “Timing” group, tick “After,” and then type how long you want the slide to remain (e.g., 00:05.00 for 5 seconds).
4. Apply to All (or don’t): Click “Apply to All” if you want it timed this way for all slides, or modify each individual slide for unique timing.
 Doing this will set a pace for your looping presentation that follows the pace with which you want to engage your audience, while at the same time never rushing the viewers.
Looping Specific Sections
Ever wondered how to have a PPT loop just for a few slides? Imagine you’re at a conference and want to keep a product demo cycling while the rest of the presentation plays once. PowerPoint doesn’t make this super easy, but there’s a workaround:
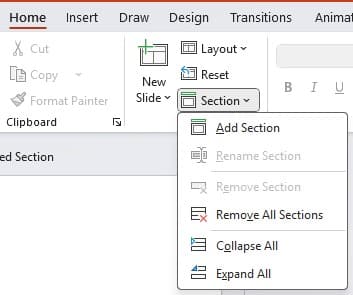
1. Group Your Slides: In the “Home” tab, click “Section” > “Add Section” to organize the slides you want to loop.
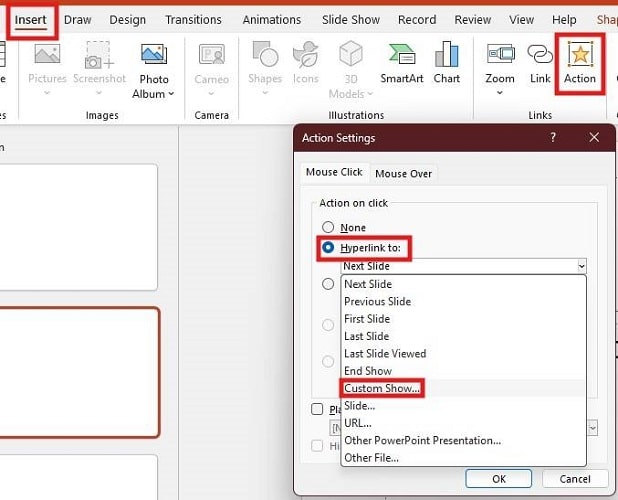
 2. Make a Custom Show: Go to “Slide Show” > “Custom Slide Show” > “Custom Shows.” Hit “New,” pick your looping slides, and name it (like “Demo Loop”).
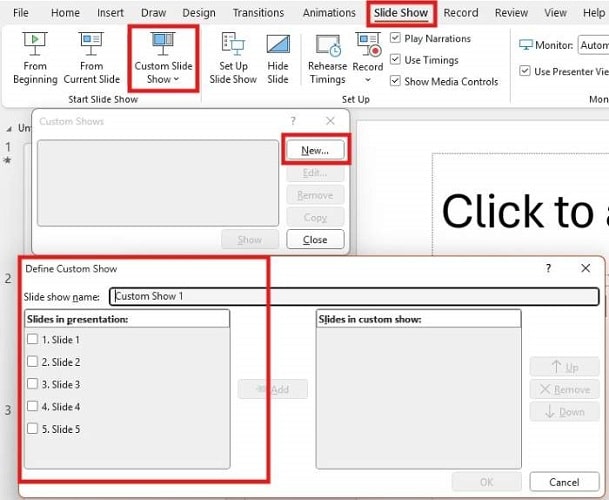 3. Link It Back: Add a hyperlink or action button on the last slide of your custom show to jump back to its first slide. It’s not automatic, but it works.
 If that feels clunky, you could split your presentation into two files—one looping, one not—and link them. It’s a bit of extra setup, but it can look really sharp when done right.
Looping on an iPad
If you often use an iPad for your presentations, here’s how you can get your slides to loop:
1. Open PowerPoint: Launch the app and pull up your file.
2. Tap Slide Show: Find the “Slide Show” tab at the top.
 3. Set It Up: Tap “Set Up Show.”
4. Switch On Looping: Toggle “Loop continuously until stopped” to ON.
5. Start It: Tap “From Start” or “From Current Slide” to kick things off. To stop, swipe down and tap “End Show.”
While the iPad version might not have every advanced feature available on desktop, it still does a solid job for most looping needs.
Making a Looping Video Out of PowerPoint
In certain cases, the best way to go is to convert your presentation into a video, an option that is usually favored for online sharing. To accomplish this:
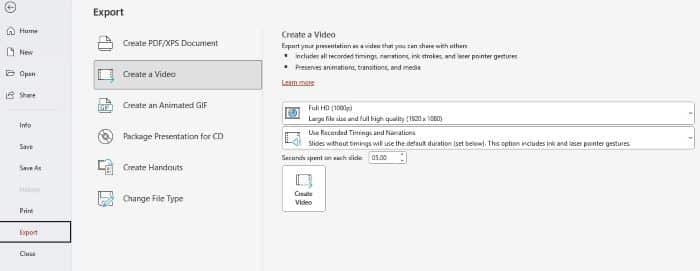
Export as a Video: Use File->Export to choose “Create a Video.”
 Loop in a Media Player: Use your favorite media player (VLC works well) and set it to loop the video.
Double Check Playback: Make sure to run the video and check that it loops smoothly without any breaks in the content.
This is a great option if you plan to share your presentation through websites or social media.
Learn how to create a continuous loop for the introduction slides of your presentation. The presenter can then exit the loop to begin presenting at any point.
Create a Looping PowerPoint Introduction by Computergaga
Frequently Asked Questions (FAQ)
Can I loop only a specific section of my PowerPoint presentation?
Yes! You can create a custom slide show that includes only the slides you want to loop, then set that custom show to loop continuously.
Will animations and transitions continue to work in a looping slideshow?
Absolutely. As long as they’re set to run automatically, all animations and transitions will work as expected each time the presentation loops.
Does looping affect animation timing?
Not at all—if you’ve set your timings correctly using the “Rehearse Timings” feature, everything should play back consistently.
How do I stop the looping presentation during playback?
Simply press the “Esc” key, and your looping presentation will stop immediately.
Can I set a specific time interval for each slide in a looping slideshow?
Definitely. Head to the “Transitions” tab, set your “After” timings, and your slides will loop at the pace you choose.
Comparison Table
Below is a quick-reference table comparing the various looping methods to help you decide which one suits your needs best:
| Method | Steps Involved | Advantages | Disadvantages |
| Basic Looping in PowerPoint | Enable “Loop continuously until ‘Esc’” in settings | Simple to set up; no extra software needed | Limited to desktop version; basic timing control |
| Rehearsed Timings | Record custom timings for each slide | Precise control over slide durations; ideal for automation | Requires extra setup time |
| Looping on iPad | Use the PowerPoint app’s looping feature | Portable; great for on-the-go presentations | May lack some advanced options available on desktop |
| Export as Video with Loop | Save as video then loop via media player | Perfect for digital signage and online use | Extra conversion step; might need additional software |
| Advanced Multimedia Looping | Embed looping audio/video and set auto transitions | Enhances engagement; excellent for multimedia-rich content | Setup can be complex; potential compatibility issues |
This table offers a snapshot of the key options so you can choose the best method for your particular situation.
“Converting your PowerPoint into a looping video opens up a world of possibilities for digital signage and online content distribution.”— MagicSlides
Final Thoughts
The secret of a good looping presentation is planning, practicing, and a touch of imagination. With these tricks, you can prettify any presentation into an automated masterpiece, running day and night.
Create, control, and fully experiment with your presentation style, trying out all the looping tips you can handle. And if you ever need any additional help or support, do not forget that our specialists at DoMyPowerPoint.com are just a click away. Contact us now!
Check out our site for more guides and custom-made services to enhance every aspect of your presentation experience.


